Category: In The Garden

Square Foot Gardening

Square Foot Gardening Book Review

Spring is just around the corner for some locales. A good book to consult while you are planning the 2018 garden is Square Foot Gardening by Mel Bartholomew. This method presents “A New Way to Garden in Less Space with Less Work.”
Square Foot Gardening is a comprehensive look at intensive gardening. Square units form the garden. Then a grid pattern is implemented. The blocks within the grid are 12 inches by 12 inches hence the name Square Foot Gardening.

The Method

Individual seed is sown across each square foot. The key is placing the seed at the distance needed for growth. For instance, beets need three-inch spacing between plants. So you would place twelve seeds inside your square foot. Plant varieties that need four inches of spacing would yield nine specimens for each block. Something large like a tomato would only have one plant per square foot.

Bartholomew posits that this method of planting reduces time, money, and energy spent in the garden. Seeds are not planted just to thin out. Thus costs are cut. The grid pattern also helps with the weeding. Less time is spent pulling weeds from the grid due to the layout of the seeds. Furthermore, the intensive nature of the beds has reduced the space within the garden and so the gardener has a smaller area to weed.

The author does not stop at describing his square foot gardening theory. The book is a complete guide to gardening. Chapters include advice on garden layout, companion and succession planting, improving the soil, extending the growing season and vertical gardening just to name a few.

Last year I began implementing square foot gardening. I had more success with this method than I did with my potato experiment which you can read about here.  Only a few squares did not achieve 100% germination. Root crops like beets are ideal for this method. But leaf crops benefit as well.

I used a yardstick to measure my squares. However Mel Bartholomew has a website that sells not only books but pre-made grids and other accessories. You can connect with the Square Foot Gardening site by clicking here.

If you can only buy one gardening book, this is the book I recommend. Mel Bartholomew describes an intensive gardening approach in Square Foot Garden but doesn’t stop there. The strategies and techniques described in the book will benefit the gardener all year-long.

Last 2017 Harvest

Last 2017 Harvest

Technically December 20th is considered fall. Today’s 60 degree temperature reflects that. But winter is literally just around the corner both on the calendar and the forecast. Since tomorrow’s daytime high will be in the 30’s followed by single digits and colder days, I decided today would be the last 2017 harvest.

As you can see in the photos, not much is left for the last 2017 harvest. In fact, the big crop of the day is the just over one pound of carrots. I should be able to make several dishes with that particular harvest.

On the other hand, the beet greens probably outweigh the roots. Fortunately we like eating the greens as well as the beet. The same small yield can be seen in the spinach and the few remaining green onions. Those will make a great egg white frittata for tonight’s supper.

Another part of the last 2017 harvest is more a matter of convenience. Since the weather is going to abruptly turn nasty, I collected some rosemary and sage to use in my Christmas dinner. Both are in protected areas of the garden, so the herb harvest could have waited. However, I prefer working in sixty degree weather versus twenty degrees and a strong north wind.

Zone 5

I live in Zone 5 and twenty years ago the last harvest would not take place in December. Part of the extension of the growing season arises from learning which plants can survive at below freezing temperatures. More research is needed on my part in order to have a year round harvest in this zone. Additionally, I will probably need to invest in cold frames or even a small greenhouse.

Until then, I am very happy to have the last 2017 harvest fall in late December. Since I usually have the earliest of crops ready by late March, fresh produce from my garden occurs almost ten months a year. Not bad for Zone 5.


Putting the Fall Garden to Bed

 Putting Away the Fall Garden

We had our first freeze last week so there were quite a few chores in putting away the fall garden. Herbs and vine crops needed harvesting. Some of the root crops were dug up. Vines were added to the lasagna and compost piles. Borders were created for beds.

Harvesting Herbs

The first thing I did was choose which of the herbs I was going to pick and dry. The basil was a given. It is a tender herb which means it is not frost tolerant. I picked one of two bushes which did not show signs of bolting. In my experience, basil acts somewhat like spinach at the end of the season. The leaves begin to narrow and become pointy. This in addition to the flowering indicate the annual plant has run its course.

I turned the basil upside down and placed it inside a paper bag. Using a string, I have the bag hanging to dry. I am also drying some thyme and oregano with this method. Both these herbs are perennials and so they can be harvested most of the winter. But I use both frequently in my cooking. Thus, I won’t have to go without if snow covers the plants.

Fall Garden Harvest

Second I harvested all tomatoes of a decent size. The green tomatoes will  turn red inside the house or they can be pickled. We extend our fresh tomato season by a few weeks by letting them ripen on the counter.

Fall Bounty
Final tomatoes

Sweet potatoes, beets and the remainder of the potatoes were dug. Unfortunately most of my root crops were small in physical size this year. The yield was not large either. Perhaps the hail damage to the foliage had a greater impact on these crops than I realized.

I was gifted some lumber scraps and I made a raised bed area for a new blackberry bush. I also edged the asparagus bed with the lumber so there will be no accidental mowing of the young crop next spring.
Finally, I pulled the vines and plants from the ground. Most looked very healthy still and those were added to either the compost bin or to the new “lasagna” bed I am working on. A few had evidence of either bugs and eggs or disease. Those plants found their way to the trash can.

I still have a few more chores to complete. Carrots remain in the ground. Hoses will need to be put away for the winter. A reorganization of garden tools is a must. I will plant the last of the garlic this week since temperatures will return to the eighties. But my time in the garden is beginning to wind down which means more time will be available for the quilt room.

Lasagna Garden Experiment

I like trying new techniques. One of the garden ideas I researched this year is the lasagna garden. Many people assume this means planting the ingredients for lasagna. However, this is nowhere close to the true meaning of a lasagna garden.


As you can see in the photo to the right, I have an area in the lot that needs improvement. I had several options. I could extend my raised bed areas, I could roto till, or I could enrich the area through a lasagna garden and have a great location for spring planting.

Building the Lasagna Garden

I chose the latter. The first step in creating a lasagna garden is laying out either newspaper or cardboard. Since some cardboard was in need of recycling I started my base layer with the more durable material. This serves two purposes. The cardboard makes a thicker barrier against the existing planting and is less likely to blow away with the high winds we experience on the Great Plains.

Base layer
Cardboard base

After the cardboard was placed whttps://www.econogal.com/wp-admin/options-general.phphere I wanted it, I hosed it down with water. Next I added a two to three-inch layer of lawn clippings. A few days later, I soaked the bed again. Then over the next few weeks I have added compost material from the kitchen as well as material from the garden. If you have prolonged dry spells you will need to soak the lasagna garden manually.

Brown vs. Green

While grass clippings are green and fall into the green category and the cardboard falls into the brown category, it is not the color that determines whether an item is brown or green. The basis for brown or green category is the chemical content. Nitrogen rich products are green compost and carbon rich products are brown. It is important to have a mixture in your compost.

Some of the kitchen scraps included banana and tomato peels as well as other fruit peelings. Eggshells are a great addition but it helps to crush them before adding to the compost. I also like coffee grounds, but with only one coffee drinker in the house, I do not have an abundant source.  I do not place meats or fats into my compost.

Garden materials are items such as leaves and pine needles. The pine needles are very acidic and can alter the PH balance of your soil. At the end of the season plants can be added. But be sure to check for disease or eggs from various pests which are often on the underside of leaves.

I may need to cut through the card board in the spring in order to plant. A lot depends on the winter moisture. However, I think the bed will be enriched from the start.

Lasagna Bed
Compost layers added

Purple Potato Grow Bag Experiment

Two soils
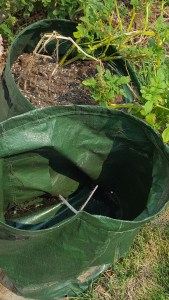
Last year I planted purple potatoes for the first time. I love them and they are very nutritious. They thrived in the sandy soil. This year I decided to experiment with growing potatoes in a bag.

I bought two bags and planted one in mid-March with purple potato saved from last year’s crop. The seed potatoes were kept cool all winter. I use a mini fridge in the basement to store seeds.

I harvested the bag last week. The yield was disappointing. Only one pound of potatoes tumbled out when I emptied the bag.

However, the soil in the bag is completely different from what I started with. I used sandy unenriched soil from the lot. When the first leaves appeared I placed some leaves from last fall on top. As leaves kept emerging, I added other layers. Sometimes it was grass clippings. Occasionally another scoop of sand.

As you can see from the pictures the soil from the bag turned into a rich compost material. The crop was a failure, but all was not lost. My question is what created the change in the soil? The experiment did not succeed as intended. But I have already used the enriched material to mulch the garden. Sometimes you have to adjust.

The second bag is not ready to harvest. The white potato seeds used were bought this spring so we have too many variables for a true experiment. However, I am anxious to see if the yield is better.

The seeds were planted later. The rule of thumb in my part of the country is to plant potatoes on or before St. Patrick’s Day. However, the white potatoes started in April. I will harvest the second bag in a few weeks.

I have mixed feelings about using the grow bags. They eliminated the need to weed which is a plus. But the yield was not worth the effort. If the white potatoes do not produce, I will not repeat the experiment.


Grow Bags

Potato Bags
Bags used in experiment

Purple Potatoes and Medium

Purple grow bag
Potatoes from Bag

Growing Medium

close up
Close up of Medium
pound
Harvested potatoes

The Seed Garden

Cover
The Seed Garden

The Seed Garden: The Art and Practice of Seed Saving

I realize we still have over three months until Christmas. But, if you have a serious gardener in the family I have the perfect gift. The Seed Garden is the perfect book for anyone devoted to growing their own edible garden. The text is edited by Lee Buttala and Shanyn Siegel and published by Seed Savers Exchange.

This comprehensive book is divided into two sections. Seven chapters make up the first section. Each chapter has beautiful illustrations. The photos emphasize the points made in the writing and aid the reader in grasping the information.

The largest portion of the book falls in the second section. Here the reader finds profiles of over one hundred edible plants. However, they are listed alphabetically by their Latin name. Fortunately, the editors provide a directory listing both the common and scientific names. Beautiful photos accompany this section as well.

In the first section, the reader may revisit knowledge studied in either a biology or agriculture class. Since I took both a long time ago, a review was helpful. Even though the book does not cover everything you would learn in a semester long class, your knowledge of seeds will expand. Saving seed is truly an art.

Basic biology covering the reproductive system of plants is an early focus of The Seed Garden. The book discusses the taxonomy of the plants. Apparently the genetic differences dictate how the seeds are pollinated.

Prior to buying The Seed Garden, my experiments in saving  seed met with mixed results. My yellow squash seeds produced fruit that were half green. They still tasted like squash even though the second generation altered in looks. The book explains why this happens and how to correct for the problem.

Another thing I learned from The Seed Garden is the need to ferment tomato seeds. The process, which is necessary to rid the seeds of natural germination inhibitors is wonderfully documented with step by step instructions. Once again, the editors use beautiful photos to enhance the writing.

I plan to try this process on a volunteer tomato plant. One of the local nurseries decided not to reopen this spring and I was unable to find a long-time favorite heirloom variety anywhere else. Luckily this year ma volunteer appeared. Next year’s planting won’t be left to chance.

Tomatoes
Illustrated Instructions

The Seed Garden is a welcome addition to my garden library. The writing is in-depth, so I would recommend it for those truly interested in gardening. This is not a beginning how-to book, but instead is written at a master level. In addition to being an excellent gift idea, this book should appear in the reference section of public and school libraries.

August Hail Storm

August Hail Storm

High Plains Hail Storms

Today’s post will have lots of photos of damage to both my garden and that of a nearby relative. While we do not suffer the threats of tsunamis or hurricanes, we have our share of bad weather. On the high plains natural disasters appear in the form of blizzards, flash flooding, strong straight line winds and hail.

I have lived in my present home for 22 years and this is the third time a major hail has hit. Most of the hail we get is pea sized or slushy and doesn’t create widespread damage. But with a storm like this, contractors will be busy for months. We may have been fortunate, depending on the assessment of our roof. Many of our neighbors have broken windows, both car and home, damage to siding and roofs. Businesses suffered as well.

The recent storm carried golf ball sized stones. We are still waiting the claims personnel to see if we will need a new roof. Our current one is just 4 years old and 3 times thicker than the average. Other damage to property is limited to screens and fascia.  However, the garden suffered a direct hit.

Fortunately, I am a fanatic about keeping apprised of the weather. A cold front bringing severe weather was forecasted, so I was aware of the possibility of damage. Once the radio indicated the front was about 30 minutes away bringing large hail I quickly harvested what I could. Any tomato with the slightest bit of red was picked along with other veggies that were near ripened state. The root vegetables were left in place with the hope that the foliage would not be totally shredded.

As you can see in the photos, the hail tore the leaves apart. I estimate the locust trees lost about half, even though the leaves are small. The oak, red buds and peaches all took a hit. The photos of my beds show stripped pepper and tomato plants and damaged artichokes. Both the potato and sweet potato plants now have holey leaves but the crops should be far enough along underground not to be stunted.

The hail beat up the veggies as seen in the photos of the tomato and peppers. All the peppers had been knocked to the ground. The hail stones even knocked holes in large fruits such as melon and pumpkins as can be seen in the photo of my relative’s 20 x 20 garden plot.

The damage was not limited to neighborhood gardens. Farmers took a hit as well as can be seen in these photos of a nearby cornfield. Each year, farmers on the high plains face this threat to crops. Because of this, yields can’t be predicted for any long term planning.

IN THE GARDEN-1st Garlic

IN THE GARDEN-First Garlic Harvest of 2017

In all honesty, this morning’s harvest was triggered by finding the headless, tailless, remains of a snake in the garden last night. The markings were similar to a bull or rattlesnake but because of the condition I am not sure which. It is quite possible the lawn mower did the creature in. Although Sophie the Hunter Cat could have been involved.

Nonetheless, the finding spurred the need to clear out a patch of weeds in an area where I had plopped some garlic last fall. There was also a volunteer purple potato plant in the mix. This area of the yard really isn’t in the garden. Instead it is in sort of a no man’s land between the yard around the house and the lot.

This distinction plays a role. The lawn is kept mowed by my spouse. The lot is my territory. Buffalo grass prevails in the non-irrigated lot, so it is green for about six weeks in the spring and brown the rest of the year. The Bluegrass/other mix watered by the sprinkler system needs constant mowing. No man’s land sometimes receives water from the sprinkler system on windy days.This particular spot has very sandy soil and a history of much failure. No fewer than four trees have met their demise there. A small Blue Spruce was planted last spring as a memorial and hasn’t croaked yet so maybe things are on the upswing.

Last year I had quite a few purple seed potatoes and I popped some in the area about a yard away from the Blue Spruce thinking having both there would spur a reminder to water. Last fall when I harvested the potatoes I was surprised to find that area had the largest. So, having little success with garlic bulbs getting any bigger than the clove I planted, I thought I would give the patch a try hoping for an outcome similar to the potato.

This spring a volunteer potato plant emerged alongside the garlic. Unlike some gardeners, I relish plants that come up on their own. I live in an area classified as semi-arid. The average rainfall is in the low teens. Unfortunately this decade has had multiple years of under 10 inches and two years below 7 which makes it a dryer time than the Dust Bowl Years. Thus, if a plant can make it up on its own I believe it has an extra hardiness factor and deserves to live.

The past month the garden needed to be hardy due to an absentee gardener. No man’s land was thick with weeds about 18 inches tall. Perfect territory in my mind for a snake. So this morning, I turned on the hose full blast in case another slithery critter was taking refuge. Two rabbits bounded out but no snakes.

Along with pulling weeds, I harvested the garlic and the potato, although the latter probably could have stayed a little longer. I am happy to report that the garlic actually looked like garlic. The potatoes were a bit on the small side. More the size of new potatoes.

The nicest surprise was a baby oak tree. One of the critters that inhabit my yard must have dropped an acorn off the oak I planted 20 years ago. The oak is one of handful in this area, since oaks just don’t grow here. Applying the aforementioned hardiness theory, I plan to let the oak grow and transplant in a few years if both trees are still surviving and one needs to move.

In the picture, the garlic apart from the others was also harvested this morning but out of a proper garden spot. It is a different variety as you can tell from the coloration. Altogether the yield was just over 9 ounces. The purple potatoes weighed in just under 2 pounds. Not bad for an early harvest off a volunteer plant.