Tag: Garden Experiment

Seed Saving Tips and Tricks

I began seed saving just a few years ago and I still have a lot to learn. But I have had quite a few successes and thought I would share some tips and tricks. If you have additional information feel free to comment below.

Why Save Seed?

While some may practice seed saving to cut down on expenses, my primary reason is the fact seed producers like fashion designers change-up their production lines. While I like trying new varieties (or buying new shoes) I don’t always want to let go of my favorites.

Both my Five Star Lettuce and my Genuine Heirloom Marriage Tomatoes fall into this category. Locally, the plants are no longer sold. In fact, I can no longer find the seed for the tomatoes available on line. So seed saving allows me to keep planting and eating my favorite produce.

Seed Saving Experimentation

For me, a key to success in sowing saved seeds comes from experimentation. The Peanut Experiment from this past spring is one example. Peanut seeds do not need to be soaked prior to planting. In fact, my findings showed they germinated better when they were not soaked.

I have made a note of this in my gardening log just in case I forget this fact over the winter. Other experimentation with seed saving is also remembered and used. My Potato Experiment using a bag to grow the spuds was a bust. The potatoes do much better in the ground or in large boxes.

Self-seeding Crops

Of course, I also have areas of the garden where annuals are allowed to self-sow. The most notable is the Italian parsley patch. In addition to the plants dropping seed at the end of the season, I occasionally give the parsley and similar plants such as marigolds a hand by dragging my hand along the seed head and sprinkling the seed in the bed.

Tips and Tricks

  1. Make sure seed is ready to be picked and saved. The seeds need to have progressed beyond the green stage. Letting the seed dry on the plant is best.
  2. Store the seed in a cool, dry, dark place. Do your research. While a refrigerator drawer may seem ideal, better places exist. Seed Potatoes should not be stored below 50 degrees F., so this eliminates the fridge.
  3. Make sure the seed is clean. This does NOT mean washing. But brush extra dirt off and remove excess vegetation.
  4. Label your seeds.
  5. Do not keep damaged seed.
  6. If keeping garlic cloves for seeding, choose the biggest cloves.
  7. Store small seeds in envelopes.
  8. Larger seed can be stored in burlap or in the case of beans, plastic containers with room for air flow.

Pictures

I am still learning about saving seed. This means taking chances. For example, beet seed and Swiss chard seed can easily cross. Commercial growers do not have their production close. I have saved seed from two types of beets, Chioggia and Detroit Red. I also saved red and white stemmed Swiss chard. We will see what happens with my saved seed from these family crops next spring.

Enjoy the pictures.

Seed heads of lettuce
This dandelion effect on the lettuce indicates the seed is ready to harvest. The small black seeds are at the base of the puff bloom.
Close up of lettuce seed
The black seeds are easy to spot at the base of the puff ball.
Lettuce seed and seed head
Leaf lettuce. The seeds form at the base of the flower. The chaff can be separated much like wheat or it can stay mixed with the seed until planting.
Two types of beets
The differing beet varieties are easy to spot by contrasting colors. But the seed looks identical.
Beet stalks with seed.
Beet seeds, Chioggia on left and Detroit Red in the middle. A beet wintered over, hence the ability to save seed.
Beet root
A look at the beet root. I did not try to eat this wintered over beet.
Green beet seed
This beet seed is still green and not ready to harvest.
Immature seed heads
These seed heads are still green. No seed can be collected at this stage.

Update on The Peanut Experiment

Back in early February I began the Peanut Experiment. Since I am not engaged in a science fair project, my notes and observations have not been detailed. But I do want to share highlights from the experiment. Since it is now almost two months later I feel an update on the experiment is in order.

Update on Peanut Plants

The original plantings included six non-soaked seeds and twelve soaked seeds. The soaked seeds were divided between good and bad quality. I fully expected the soaked seeks to do the best. After all we eat the seeds of the peanut plant and they do have a crunch.

Boy was I wrong! This update shares just how wrong I was. The initial phase of the experiment began February 11. Click here to view the blog post. My February 2020 Wrap-Up shared photos of the first sprouts. At that time it looked like the soaked peanut seeds had the advantage.

Success Rate

However, only one soaked seed ever sprouted. One out of twelve is not a good success rate, just 8 %. But on March 5th a second of the non-soaked seeds popped through the seed starter mixture followed by another on March 8th. By the 21st of March, no other peanuts had sprouted. So, I planted non-soaked seeds in the cells without growth.

As you can see from the photo update, the peanut seed pushes up through the soil surface. The first of these new seeds pushed through the soil a week ago. A few days ago, I gently tugged at the non-sprouted seed. Roots firmly held in place, so I decided to wait a little longer before writing an  update.

The wait proved warranted. Three new sprouts have sprung . Two more cells have indications that soil is being pushed up. The surface of the crust is breaking.  Each peanut seed is planted at a depth of 1 ½ inches. Thus, basically towards the bottom of the cell. Yet the seeds surface before the green sprout appears. The roots are quite strong. Since peanuts are legumes, this makes sense to me.

Tray with small sedlings
Green growth emerging from peanut seed
Tops of seeds pushing through soil

Transplant Update in a Month

Peanuts need warm air to thrive and are damaged by even a light frost. So, I will not transplant these peanuts until after Mother’s Day. (We have had snow on the ground to usher in Mother’s Day.) However, once I do pop these into my raised row garden, I will post another update. I am quite excited about possibly transplanting as many as ten peanut plants started by seed into my legume row. Rotating crops is a gardening priority. Soon these peanut seeds will follow the peas and precede the beans into the legime row.

The Peanut Experiment

There was a smattering of snow on the ground this morning. Just enough to know moisture fell overnight. But my peanut experiment was already started. So I will just carry on.

Why Peanuts?

The High Plains is known more for grains. Legumes planted in the area tend to be soy or pinto. Peanuts are not grown commercially in this area. But they can be grown in the home garden.

I first planted peanuts in 2018. A nursery in a nearby city of 30,000 had some peanut plants for sale. Impulse buying struck and a four pack of peanuts made it into the cart. They survived in the raised bed but only a handful of peanuts were harvested.

peanut in raised bed
2018 Peanut Plant

Last year, I returned to the nursery specifically looking for the plants. After finding them, I doubled the purchase amount. The plants joined the garden on Mother’s Day. A late frost a few days after nipped the garden and delayed the growth.

However, the end result was a positive one. The peanut harvest yielded over a pound of peanuts. Not bad for about six feet in a raised row. So this year, I am hoping for another successful season.

The Peanut Experiment

Peanuts need warm soil and a long growing season. Starting the seeds indoors should help me get a step up on the planting. Plus, I will know before May if my starts are viable. If I fail, I can always make the two hour trip to the nursery for the professionally grown bedding plants. (Yes, a two hour drive gets you to a “nearby” city.)

After last year’s harvest, the peanuts were hung to dry in the garage much like the garlic. I then sorted through the crop before storing in a recycled flour bag. Pods that looked iffy were pulled aside. My thought was to use those for seed.

The Method

Last night after extracting the peanuts from the culled shells, I questioned the viability of the seed. So, I pulled some of the good pods from storage. As you can see from the pictures, they look much better before soaking.

I then decided to create the peanut experiment. I divided the nice looking peanuts into two groups. One half was soaked overnight and one left dry. Further, all the poor looking peanuts were also soaked overnight. I was amazed at how much they plumped from the soaking.

I picked the best six from each group for planting. Each type is in a separate container and the containers are clearly labeled. Small pebbles were placed over the drainage holes. This keeps the soil from escaping during watering but allows for drainage.

The same seed starting soil is in each of the containers. The soil was moistened before the seeds were place about 1 ½ inches deep. Additional soil was scattered over the seed. It should be noted that I did not use an inoculant. I want a baseline to measure by. Inoculants can be beneficial, but that is another post!

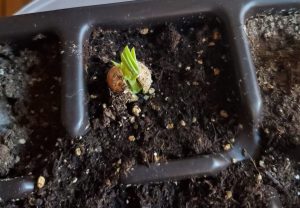
During the day, the growing pots will be kept near a South facing window because I do not have “grow” lights. Last year, my started seeds were placed on boxes and the boxes stood beneath the LED light above the cook top overnight. Once seeds have sprouted, I may repeat this if the stems seem spindly. However, the larger seed pod makes me think this will not be needed.

Legumes and Soil Enrichment

In addition to enjoying the peanuts as a snack, growing legumes is good in the garden. To be honest, the harvested peanuts are secondary to using the plants as nitrogen fixers. Peas are also good for the soil, but they seldom last past late June as the heat becomes too much.

However, the peanuts thrive in the heat. Their pretty yellow flowers attract pollinating insects. Last but not least, they remind me of the Deep South.

Enjoy the slide show.

  • Peanuts in shell
    Culled Peanuts set aside for seed.
  • Shell peanuts for eating
    Peanuts originally saved to eat
  • Bag of Peanuts
    Bag of Peanuts
  • Shelled peanuts poor quality
    Shelled peanuts from culled group.
  • Peanuts soaking in measuring cup
    Peanuts soaking overnight
  • Shelled peanuts
    Shelled peanuts from edible group
  • non-soaked peanuts
    Non-soaked peanuts
  • Soaked peanuts
    Soaked peanuts from culled group
  • Edible soaked peanuts
    Soaked peanuts from edible group
  • Three groups of seed
    Comparison of soaked and non-soaked seeds
  • Pots Labled
    Pots Labled
  • Small rocks plugging holes in bottom of pots
    Rocks plugging holes in pots
  • Pots and rocks
    Getting ready to plant
  • Seed Starter Soil in Pots
    Adding Seed Starter Soil